
Here are a few ideas to get you started and you can also have fun thinking of your own “box” ideas.
The first time you introduce each box, you will teach your child how to use the items. After several times, they may learn how plus add a few more ideas of their own!
Relax and be open to the ‘magic’ of play.
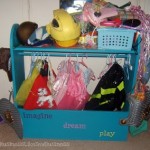
- A box of dress-ups – it’s always fun to try on mom and dad’s clothes, shoes, hats, purses, vest, etc.
- Find small containers that your child will have to work at a little bit to open. Have a treat inside.
- A box of musical instruments – a large can or oatmeal box for ‘drums’; pots and a wooden spoon make a great noise, bells, whistles, and flutes. Have a marching parade throughout the house.
- Sensory box – beads to run through your child’s fingers, different types of fabric (fur, silky, rough like burlap, etc.) Squeeze balls, scented items, pin wheels, soft chimes – think of all the senses.
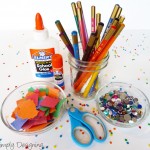
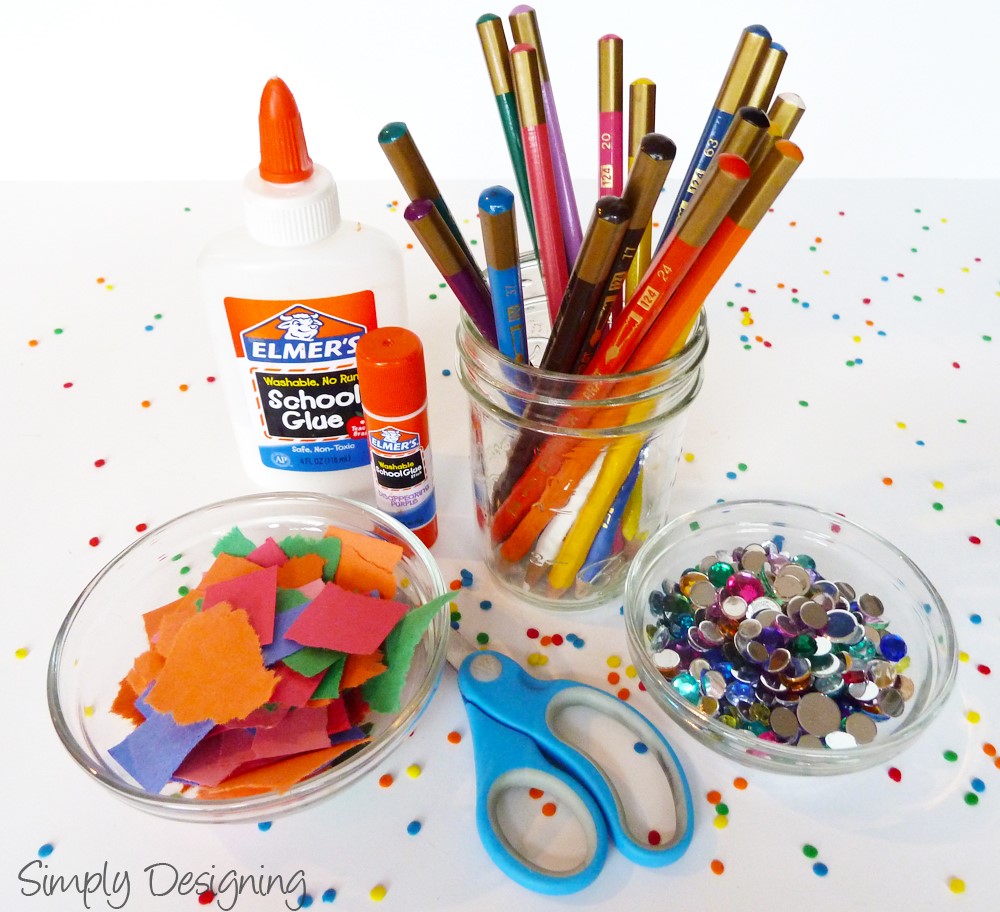
- Box of craft items – put some items out and see what your child comes up with. If he/she does not know what to do – you start with, “Look, I’m using glue to stick the picture on the paper.” Look around the house for colored wrapping paper then cut it into strips and shapes. Include a glue stick, colored pencils/crayons, sticker, and sparkly items.
- Play-dough box – small dowels for rolling pins, cups, and cookie cutters to make shapes, actually anything to press into playdough for shapes.
- “Heavy” box – bean bags to throw into a laundry basket, 2 liter bottles filled with water (glue on the lidsJ) to load in and out of a wagon or cart or use for bowling or laying a bottle flat on the floor and roll it back and forth to each other.
- Ball box – different sizes and weight of balls – toss into a target (lie a box or laundry basket) – hand a beach ball from a tree branch and use a foam ‘noodle’ (like the ones used in pools) cut in half or thirds for a bat. Having different sizes of weights of balls and aiming for different targets helps to develop motor planning.

- Shopping day – put out grocery items and/or clothes throughout the room and have your child put desired items in their cart. You can help with ‘checkout and bagging’.
- Presents – collect a variety of small boxes and put a treat (food or toy) in each box and use scraps of wrapping paper to wrap them with. Pull out on a trip in the car, waiting at the doctor’s office, at the grocery store, etc. And let them spend a few minutes unwrapping their presents. Not only fun but works on finger strengthening.
Permalink
|
0 Comments

School is out and it is vacation time! We Care’s occupational therapist has some great ideas for traveling with children. Try a few, or if it is a long trip, maybe all of them.
- Purses and containers with Velcro, snaps, zippers, etc. are not only fun but can help with fine motor skills. Fill a purse or container with snacks or toys and let your child find the “treasures.”
- Get two or three view masters with a variety of your child’s favorite character ‘films’.
- Arrange cotton balls, small toys, or other smaller items on a tray and let your child use small tongs or clothespins to pick them up.
- Pack your child’s backpack with small books, a magna doodle, crayons, paper, stickers and their favorite small toy.
- Get some thick string or a shoelace, different types of cereal that can be threaded and let them make an edible necklace.
- Do ‘arms up high – touch the sky’ – deep pressure hugs – finger/toe pinches (not too hard – playful) – blowing on pinwheels plus stretching and breathing (have your child take a deep breath and then blow out the imaginary candle) can give a welcome break.
- Get a deck of ‘Go Fish’ cards. Tape one set of some of the pairs on the bottom of a tray and put Velcro dots on all of the cards. Have your child stick the matching card on.
- Get small flash lights and hide under the airline blanket or a blanket you have brought. Also, you could get ‘glow in the dark stickers’ to put on arms and legs.
- Get a small DVD player with headphones for movies and songs.
- Have extra baggies of fun things to do in your backpack to switch out when your child gets bored.
Have a wonderful trip! Don’t forget calming music (for the kids and for you!)
Permalink
|
0 Comments
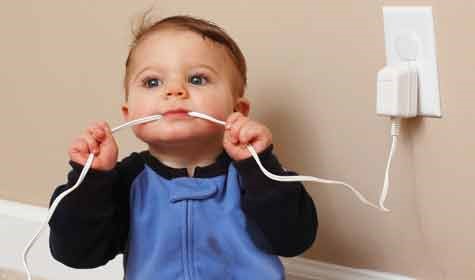
Top 10 Home Safety Tips for Kids
Follow the link below to read the article.
Marie Willsey “Top 10 Home Safety Tips for Kids” 5 October 2009. HowStuffWorks.com. <http://health.howstuffworks.com/pregnancy-and-parenting/10-home-safety-tips-kids.htmTop 10 Home Safe Tips for Kids> 31 May 2016
Permalink
|
0 Comments
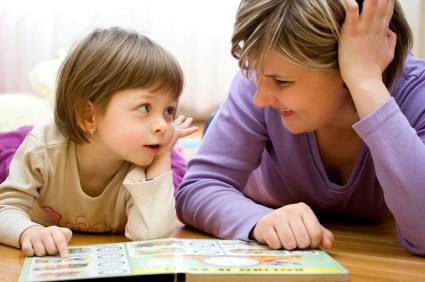
This blog about exploring the library is being shared from KinderCare. http://www.kindercare.com
Some kids LOVE the library. Stacks of books, cozy nooks, infinite possibilities and stories to explore…their imaginations seem to light up. Other children feel a little stifled in an atmosphere that requires quiet… You, too, may be full of questions about how to introduce children to books and the library. Where should you start exactly? How do you find books for kids who are just learning their letters? How do you get kids to read something other than Strawberry Shortcake? Luckily, most libraries have built-in experts (a.k.a. librarians) who know how to help you get the most out of one of the very best (and totally free!) community resources available. So we tapped librarian, tutor, and teacher Katrina Clift—who’s been working with early readers for 30 years in St. Helens, Oregon—to share her ideas for getting kids and families jazzed about the world of books. Take a look, check out a book, and fall in love with the local library in your life! – See more at: http://www.kindercare.com/blog/hey-check-this-out-7-tips-for-exploring-the-library-with-little-people#sthash.qoEetxnP.dpuf
Permalink
|
0 Comments
Is my child developing normally?
Almost all parents wonder this at some time in their child’s early years. Here we’ve put together a list of self help skills that most children acquire between 12 and 36 months of age.
Below are signs to look for that may signal a delay in development or a dysfunction in sensory integration.
Cognitive Delay
By 12 months of age:
No visual tracking or responding to sound Not beginning to repeat actions to elicit pleasurable results
Not attempting to attract attention No interest in games like peek-a-boo
Doesn’t search for hidden or removed objects Not anticipating effects of actions
Not using toys for intended purposes
By 24 months of age:
Doesn’t understand function of objects Doesn’t imitate
Continues to explore items by mouthing Constantly moving from one item to another, inability to attend for brief periods
Requires constant attention to remain engaged Not showing interest in children their own age
By 36 months of age:
Not interested in pretend play
Not demonstrating simple categorization (like matching and sorting)
Not initiating or reciprocating simple interactions with children their own age
At any time child experiences a dramatic loss of skills
Sensory Integration Dysfunction
Child does not like to be touched or seeks excessive touching
Child does not like to touch sticky substances, to walk barefoot on grass, to wear certain clothing, to have hair brushed or cut, to have finger nails cut, or to have other people too close to them
Child falls frequently or is unsafe on playground equipment
Child often appears to be in constant motion, or to have a short attention span
Child engages in rocking motion often, slams himself up against furniture/walls/people, plays hard with toys
Child avoids activities that involve head movement, such as swinging
Child is a fussy eater and has difficulty eating food with lumps or textures in it
Child appears to be sensitive to light or sound
Child is often fussy or aggressive for no apparent reason
Once a child enters the toddler and preschool years, there may be concerns about language development. Here are some things to watch for in children from 3 to 5 years old.
Cognitive Delay
Between the ages of 3 and 4, most children can:
Identify and name different colors
Sort and classify objects by simple characteristics Understand and make simple patterns, sequences, orders and understand opposites
Understand numbers and quantities in their everyday environment
- Recite numbers to 10
- Count up to 5 objects using 1:1 correspondence
- Recognize and name a few written numerals Develop a sense of time, talking about what happened today and tomorrow
Between the ages of 4 and 5, most children can: Compare and describe using bigger and biggest, small and smaller, more and less
Understand more numbers and quantities
- Count 10 or more objects
- Recognize names and written numerals 0-9
- Understands simple addition and subtraction using numbers up to 4Recognize and name at least the written letters of their own nameName and briefly explain pictures that they draw
- Know the days of the week, months and seasons, but still cannot tell time
- Understands that letters represent sounds and associate some letters with sounds
motor development
Between the ages of 3 and 4, most children can:
Jump off the floor with both feet Gallop
Hop and stand on one foot for up to 5 seconds Kick a ball and throw it overhand
Catch a bounced ball most of the time
Walk forward and backward with good coordination Walk up and down stairs
Climb at least 3 rungs of a ladder and ride a tricycle Hold a pencil with fingers and use scissors
Draw circles and squares
Scribble letters and numbers or “letter-like” forms String 1/2 inch beads and stack 8 cubes
Put 8 pieces in a formboard Complete a simple puzzle
Between the ages of 4 and 5, most children can: Run and demonstrate good coordination Jump over objects
Stand on one foot for 5 to 10 seconds Hop on one foot
Swing and climb easily, may be able to skip Draw a person with 3 parts
Copy a cross, trace a line, square and triangle Imitate drawing a square
Connect dots and cut on a line
Print own name and some letters of the alphabet Usually can fasten and unfasten buttons and snaps
Permalink
|
0 Comments
From the day children are born, they are designed to explore the world through their senses. That’s why toddlers and babies put everything in their mouths to explore. From those very first days, children learn about the world by touching, tasting, smelling, seeing, and hearing. Sensory play contributes in crucial ways to brain development. Stimulating the senses sends signals to children’s brains that help to strengthen neural pathways important for all types of learning. That’s why sensory play is so important – children’s brains are most engaged out of the right side of the brain through visual and spacial learning. They are learning by doing, exploring, and using all “8” senses. These 8 senses are:
- Sight
- Hearing
- Smell
- Touch
- Taste
- Vestibular – sense of balance
- Proprioceptive – sense of where your body is in space
- Interoceptive – sense of what is going on internally in your body
The more you can engage all 8 of these senses in your child’s environment and activities, the more their brain will retain and learn.
For example, as children explore sensory materials, they develop their sense of touch, which lays the foundation for learning other skills, such as identifying objects by touch, and using fine-motor muscles. The materials children work with at a water table for example have many sensory attributes (warm or cool, wet or dry), sensory bin fillers (rough or smooth, hard or soft, textured or slimy).
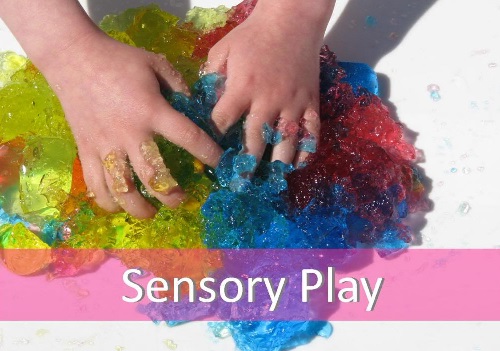
Sensory Play Isn’t All About Touch
When most people think of sensory play they might picture sand and water tables or kids playing with kinetic sand or play dough. But sensory play isn’t just about touch; it’s also about the other above mentioned senses too.
For example, the scent of vinegar, colors, textures and smells involved in the proposed sensory play ideas below will be appealing to your child’s senses.
Sensory exploration is a child’s way of examining, categorizing and making sense of their surroundings and it’s beneficial to provide them with opportunities with such experiences through sensory play.
Sensory Play Helps Building Motor Skills
As sensory play often involves using and building fine motor skills by exploring things using pinching, pouring and lacing movements, it helps develop motor skills.
There are two main types of motor skills your child develops–fine motor and gross motor skills. Gross motor skills deal with the coordination of large muscle groups and are responsible for activities like running, walking and fine motor skills are those that require the ability to use and coordinate small muscle groups.
Sensory Play and Language Skills
Giving your child the chance to play with different types of textures and smells and objects helps them discovering and talking about the world in more detail. Suddenly water isn’t just wet; it can be wavy or slippery with bubbles or cold and translucent when frozen.
Sensory Play is Calming
You may have noticed that your child is calmer after bath time or after jumping or running around outside. This type of sensory play is calming for kids. It helps them regulate their internal discomfort (whether that discomfort was boredom, restlessness or maybe even some sort of agitation).
Sensory Play Ideas:
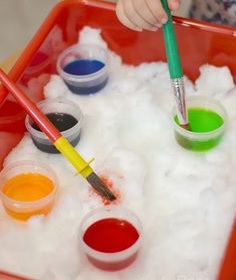
Painting on “Snow”
Materials needed: DIY snow (blend ice cubes in a food blender), paint (poster paint, watercolors, food coloring), paint brushes, pipettes and/or water spray bottles.
Prepare your paints. You can use any of the above mentioned options (we used water colors). Use pots of water or water spray bottles with colors (we used food colors).
You can do this activity inside or outside (we did it outside) to create a colorful work of art using the DIY snow as the canvas.
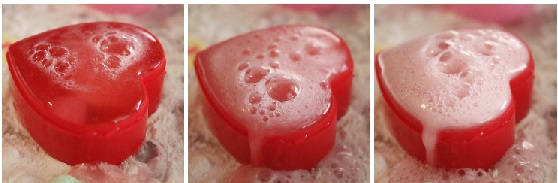
Fizzies
Materials: Baking soda, vinegar, food colors, glitter, spoon or pipette, small containers.
This is a fun, fizzy “science” experiment that you can try even with an elementary school aged child. To do this “experiment” take a small container (a nice variation can be the shell of a fruit) and fill it with some baking soda and glitter. Place the vinegar in a separate container along with a pipette. We added some food coloring to the vinegar to add an extra fun element. Use the pipette to drop vinegar on to the baking soda. Add a little or a lot and watch as the chemical reaction happens between the baking soda and the vinegar to make a big fizz. Also listen to the great sound it makes and talk about it. (What you are seeing is the chemical reaction taking place as the base (the bicarbonate of the soda) reacts with the acid (the vinegar). When they mix together they create carbonic acid, which is unstable. The carbonic acid splits up into water and carbon dioxide- and that’s why you can hear and see the fizzing.
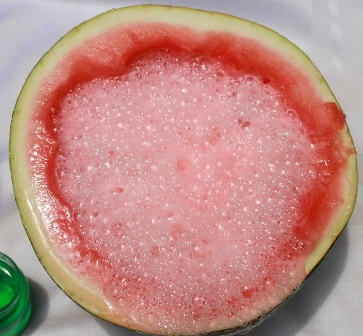
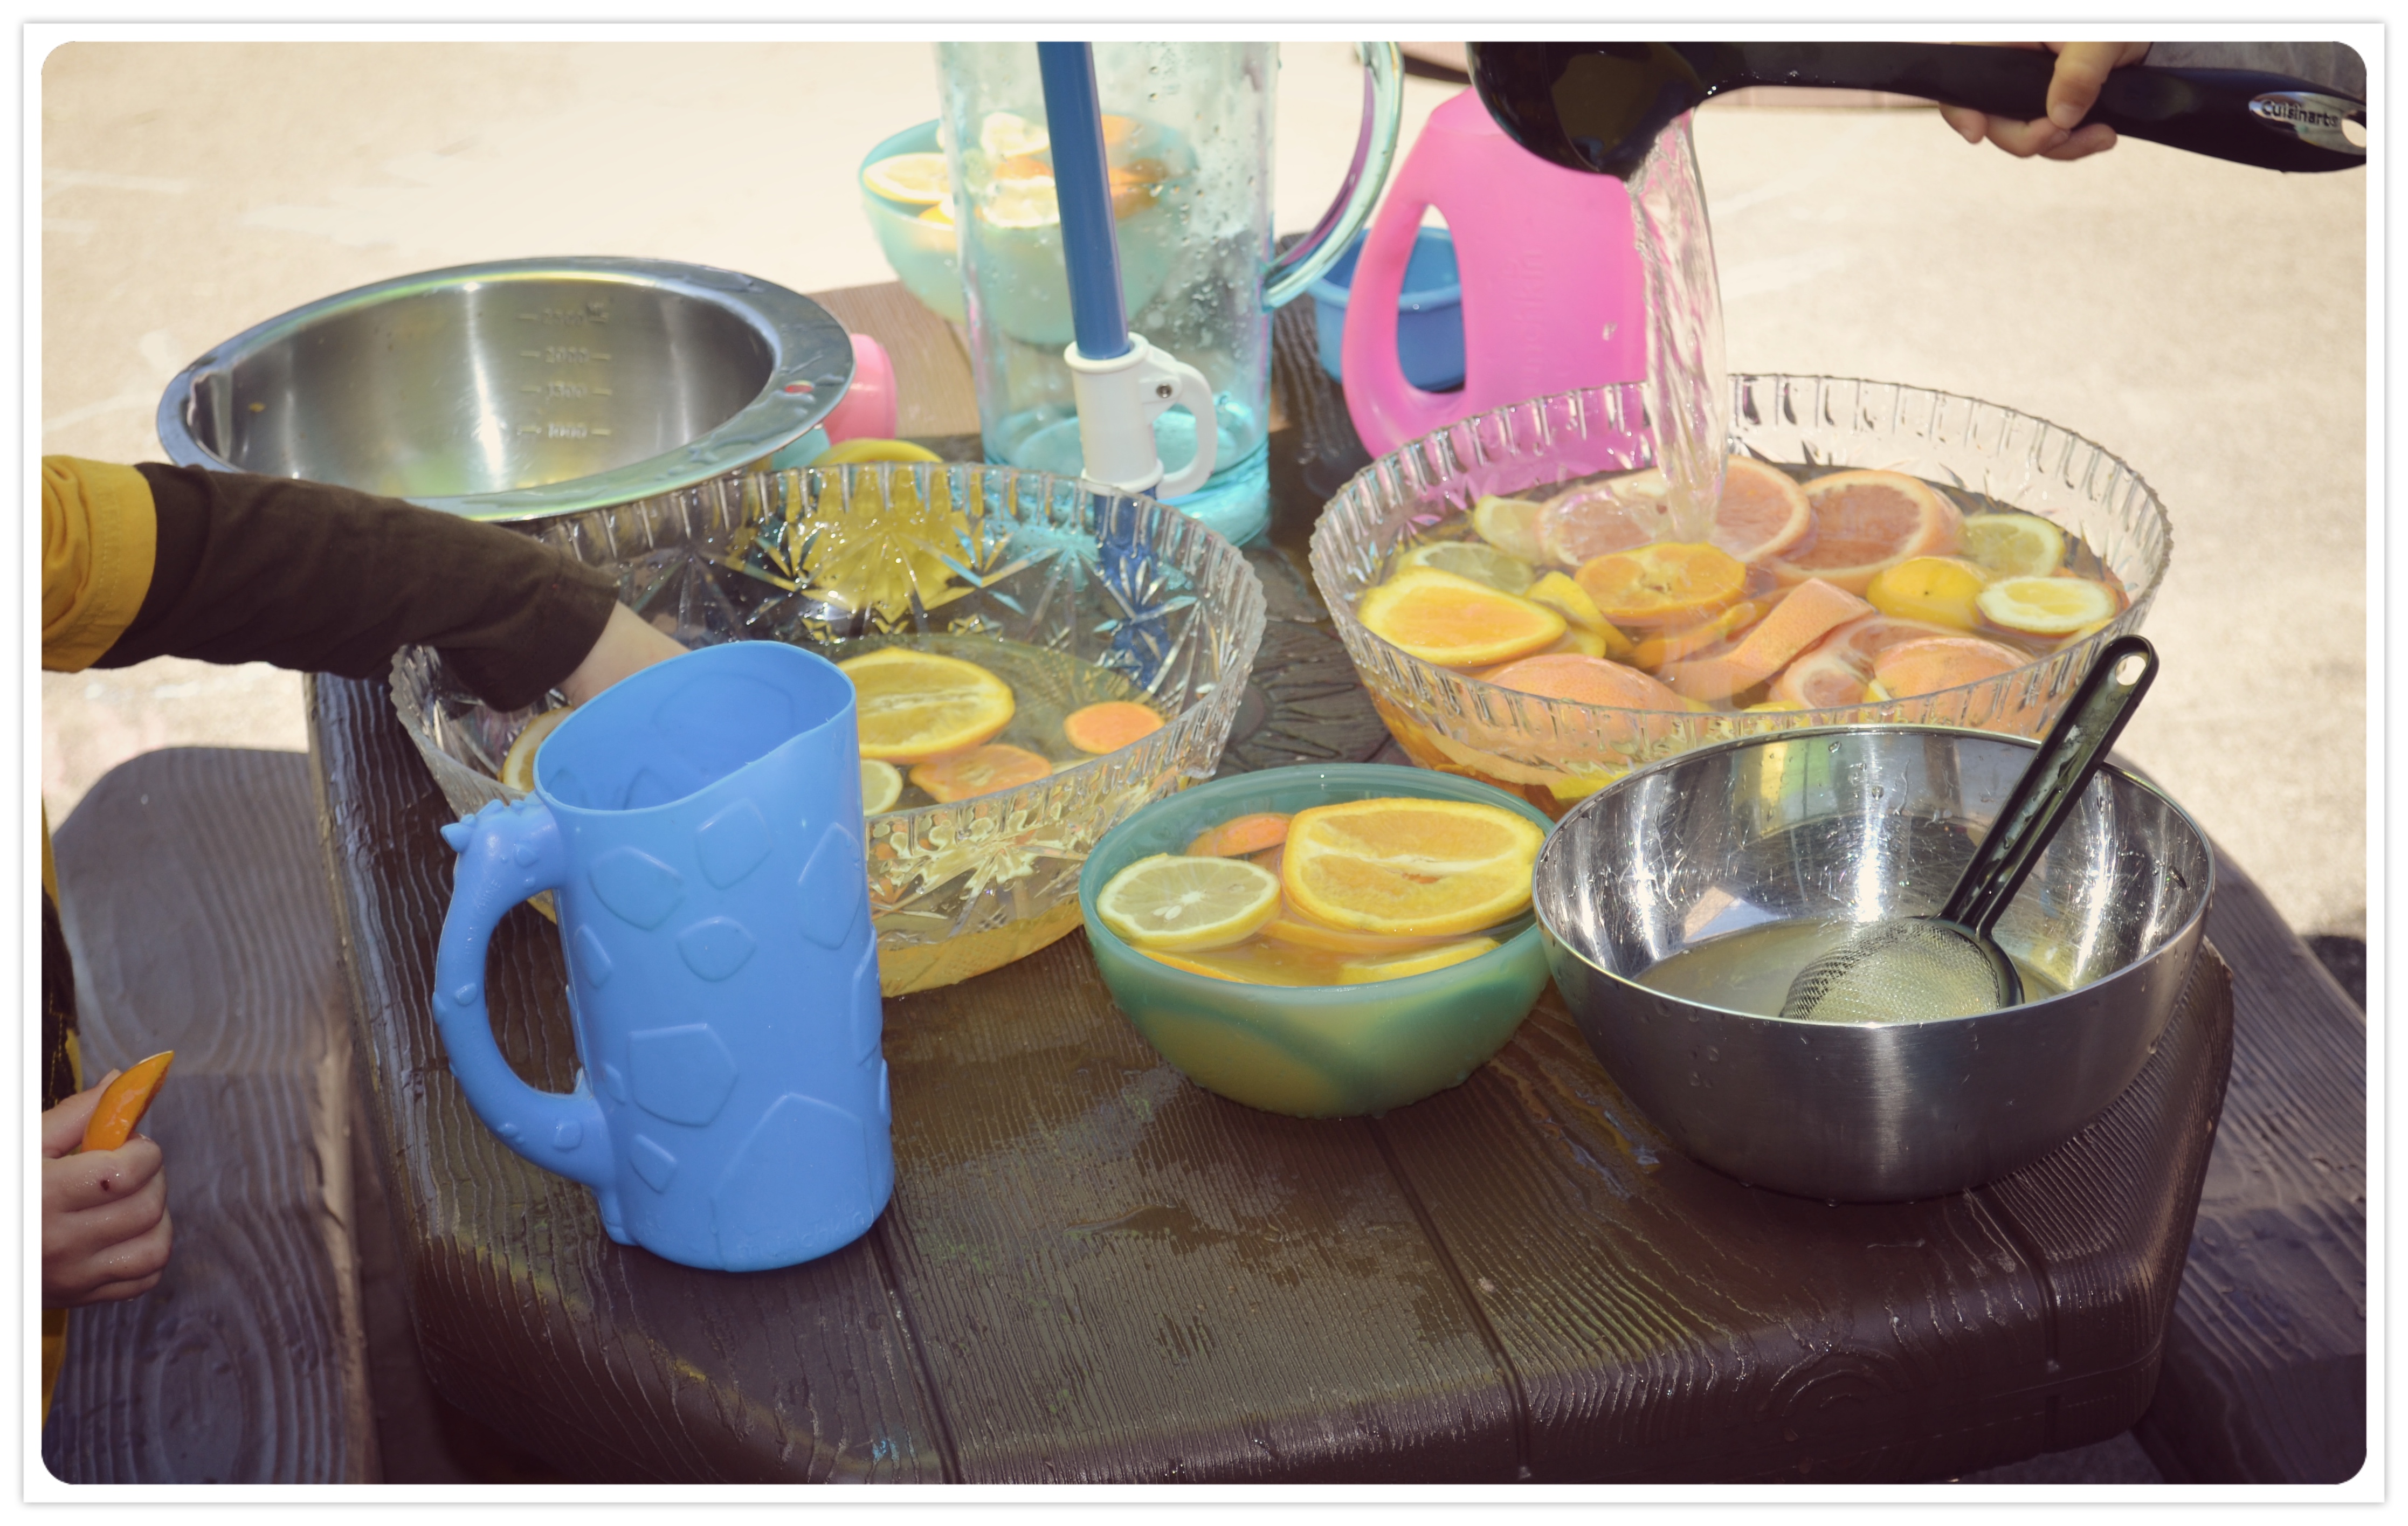
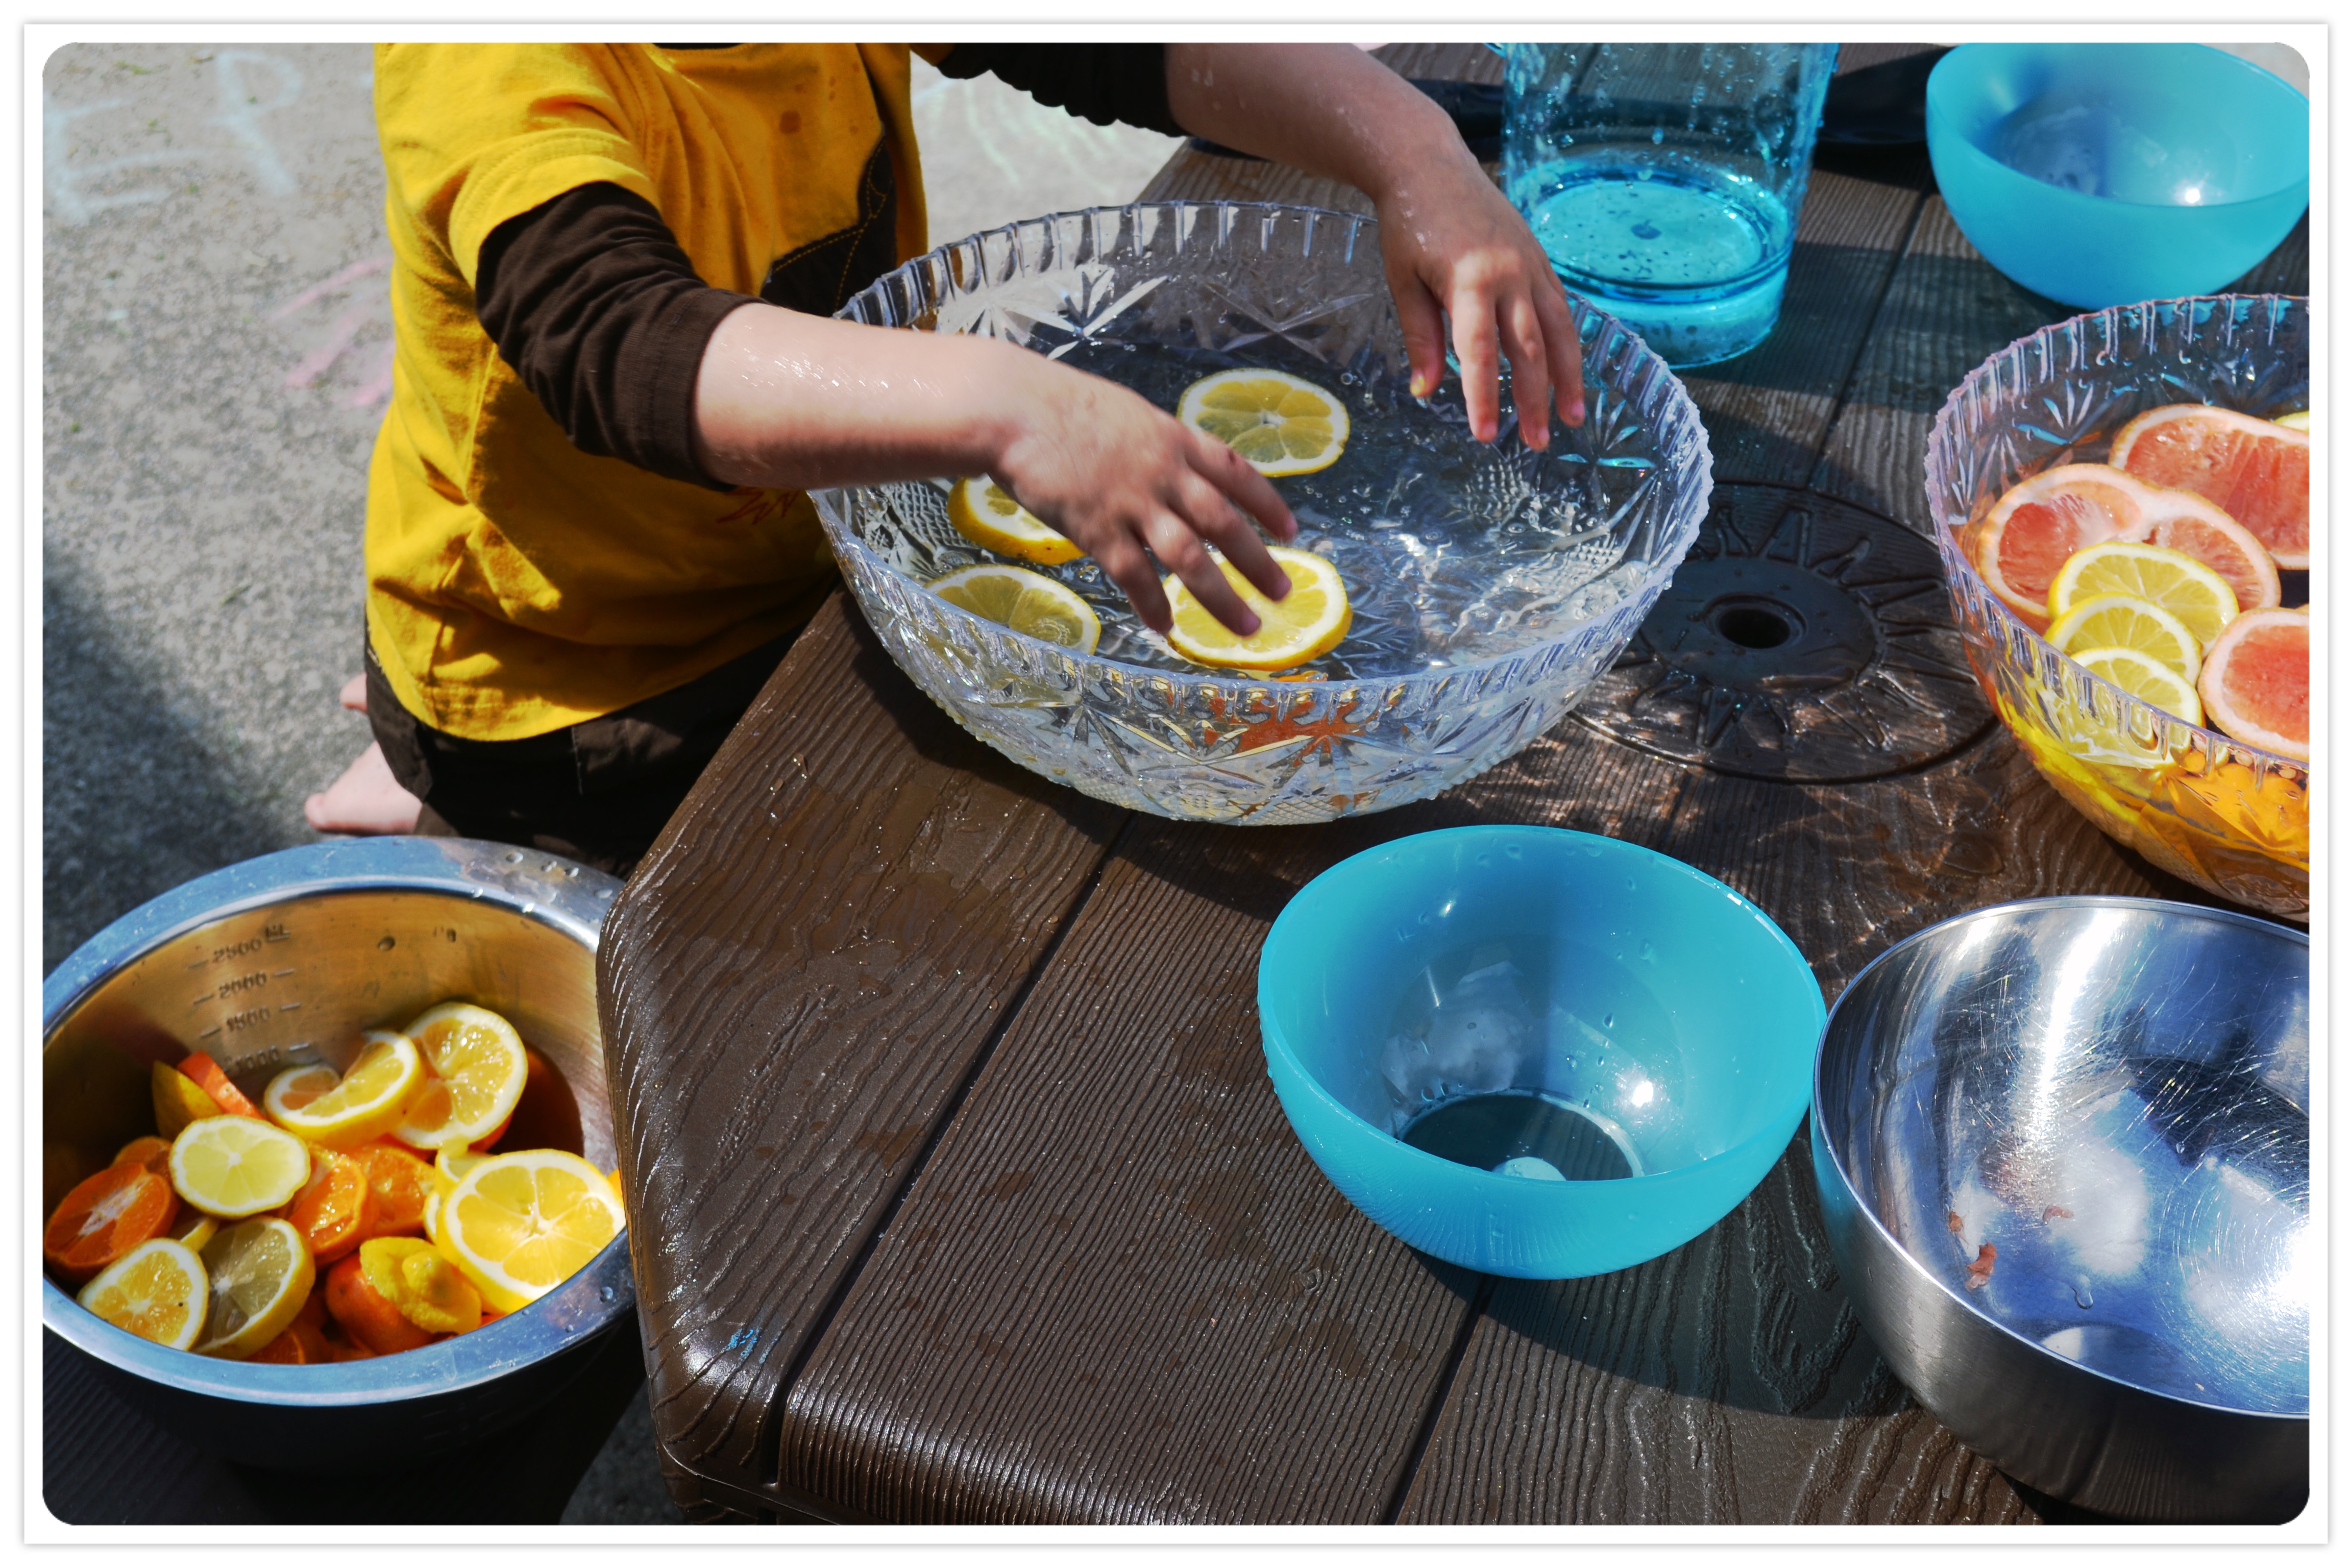
Fruit Soup
Materials: Container (any container you have to hold the “ingredients”), citrus fruit such as lemon, orange, grapefruit, lime, etc. essential oils or citrus juice, spoons, scoops, funnels, bowls.
Fill your container with water, adding yellow or orange food coloring (optional). Slice up a variety of citrus fruits, preferably with a good combination of colors. Squeeze some of the fruit slices (or an essential oil) to add fragrance to your bowl. To let the kids play with this “soup” provide spoons, ladles, slotted spoons and any containers you can add for scooping and pouring. Let your kids find their own way to play with this “sensory soup”.
Suggestions: You can talk about the different colors, shapes and scents of the fruits, play matching games by scooping all fruit of one color into one container and another color into a different one. You can create “art” by arranging the slices on top of the water.
Another added benefit to this activity is that citrus fruit is believed to have antibacterial and antiseptic properties, to stimulate the immune system and to be a refreshing mood lifter.
Permalink
|
0 Comments
Some of the benefits of DIY toys are financial as they typically are a lot cheaper than something store bought. However, another reason DIY toys are so great is that you can tailor them to your child’s interests (that can change so very quickly) and DIY toys encourage the parent’s interaction. It’s known from studies that it’s these early give-and-take conversations between parent and child that are so crucial to their ongoing cognitive health. When a flashy store bought toy is placed in between the two parties that might reduce the length of the conversation/ interaction. Here are a few ideas for some easy and cheap DIY toys:
DIY Toilet Paper Roll Blocks

For each block you’ll need one empty roll, two 3″ circles, and one rectangle that’s roughly 5.5″ X 4.25″
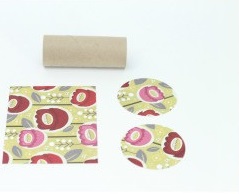 Smear hot glue down the short side of one rectangle and press on to the toilet paper roll, smear hot glue down the other short side, wrapping it around the roll and pressing firmly to overlap
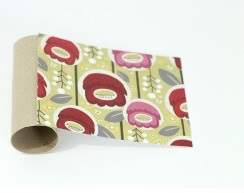
Dab hot glue dots all around the open end and press the glued side firmly down on to the circle, do the same for the other side.
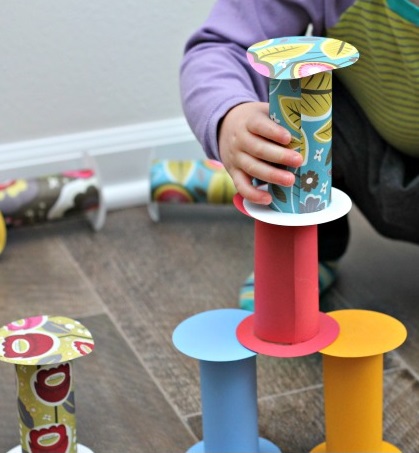
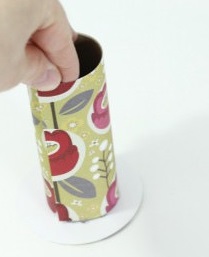 These blocks stack easily and can be used many different ways. You can use them as “bowling pins” and children also enjoy rolling them down ramps and stairs. This could also be a great craft project for older kids as they can help decorate the “blocks”. Decorate them as animals or turn them into “learning blocks” with letters or numbers. The possibilities are endless.
DIY Mailbox
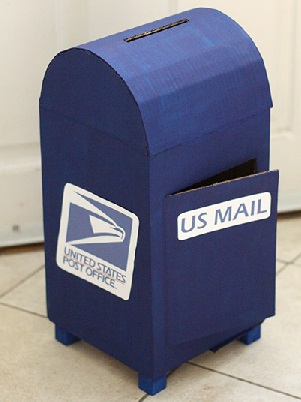
It’s always fun to play “post office”, to write letters, put stamps on postcards and letters and to deliver them. We thought creating our own mailbox would make this fun “pretend play” more exciting. If you have boxes laying around your house this mailbox is fairly easy to make. A tall rectangular box with a square base would be ideal, but any box you have will do.
Instructions:
On two opposite top flaps, draw a semi-circle as wide as the flap. That will be the curved top of the mailbox.
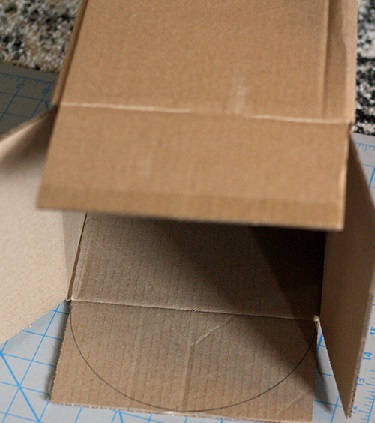 Using sharp scissors or an exacto knife, cut along those semi-circular lines. Then use half of the flaps you cut off and glue them inside the box to reinforce the semi-circle flaps and keep them standing straight up.
Decide which side will be the front, draw a rectangle and cut along 3 sides, leaving one tall side uncut.
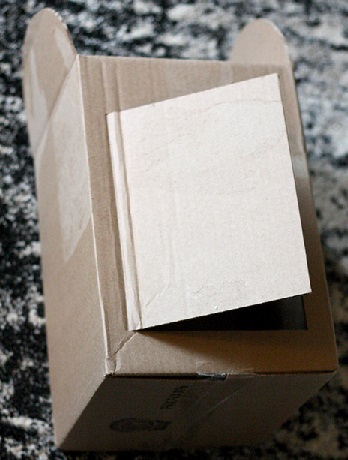
Find or cut a flat piece of cardboard that is equal in width to the distance between the two semicircular flaps for the top of the mailbox. Then use a ruler and an exacto knife and score parallel lines on the back side across that width about an inch apart. You just need to lightly cut the very first layer of the cardboard. Then fold the cardboard gently so it starts to curve.
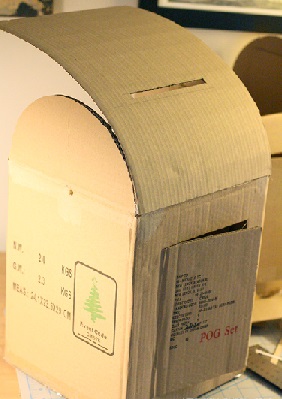
Hold your curved top piece in place and measure how long it will need to be-this is basically the length of the top curved edge of the mailbox and cut it to length. Then draw and cut a slot for the mail to go in the middle of the top. Finally, use hot glue to attach it to the top. Try and keep the glue on the inside.
To make the mailbox more realistic looking you can glue 4 1″ wooden blocks to the bottom for the feet (not necessary).
After the glue is dry, paint the box “mailbox blue” with acrylic craft paint.
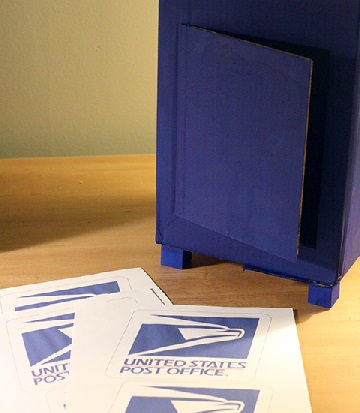 For the logos, you can find the images with a quick Google search and print them on regular paper, cut around them and glue them on. You could also paint them if you wanted.
Alphabet Monster
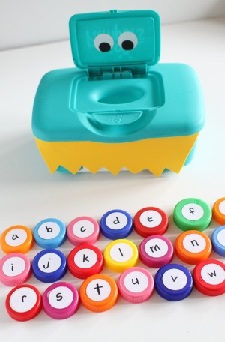
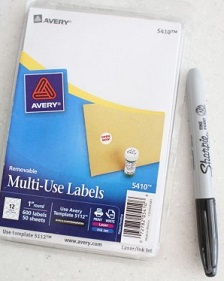
Items needed: A plastic baby wipes container, bottle caps, and 1″ stickers and a sharpie pen.
Decorate the baby wipes container with colored paper, googly eyes etc. to turn it into an “alphabet monster” (or anything else you think your child will enjoy feeding) while learning the letters, numbers, words (pictures) you decide to put on the labels.
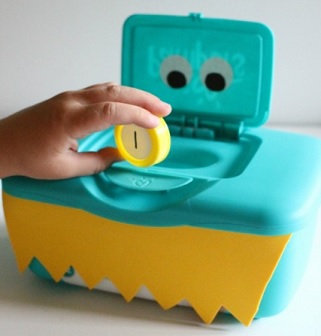
Write letters (either capital or lowercase) on the stickers.
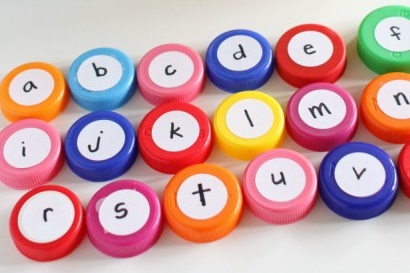
Have your child “feed” the caps to the monster one at a time while saying each letter.
Permalink
|
0 Comments

Plan It Out: Kids thrive when they know what to expect. If your kids are old enough, sit down and create a routine together, a visual chart can be very helpful for pre-readers.
Work Backward: Look at your bed time routine estimate and how long it will take to complete all of the tasks. Then, work backward from the ideal bedtime for your kids. This may mean that you start the bedtime routine as early as 5:30 or 6:00! If this doesn’t work for your family’s schedule, change the number of things included in the bed time routine.
Start Before They are Tired: Kids can become over tired, which makes it harder for them to calm down. It may seem easier to let your kids stay up later, so they will be more tired, but once your kids are too tired they might be unable to function without a meltdown.
Limit Screen Time: No screen time at least 30 minutes before bedtime. This also means not letting them fall asleep with TV or Ipads. It may mean that the whole family needs to turn off the TV for a while until your child is in bed.
Gradually Calm Down: Most kids can’t go from running around the yard to relaxing for a bed. Tweak your bedtime routine so that the most relaxing things are at the end. See what’s most calming for your child. Every child is different and bath time, snacks or even reading can be energizing depending on the child.
Create a Clutter Free Space for Sleep: Make sleep the main focus of the bedroom. Limit clutter, extra toys or other distractions. Choose nightlights or low watt bulbs in lamps. Have your child pick a few things that make them feel safe, calm and snugly in their bed.
Teach Kids To Relax: Both anxious and energetic kids can benefit from learning how to relax their bodies for sleep. Focus on having calm, quiet, relaxed bodies, rather than forcing sleep. Some kids enjoy relaxing music, visualizations, audio books or white noise or to say a prayer.
Ideas for a Fun Bed Time Routine:
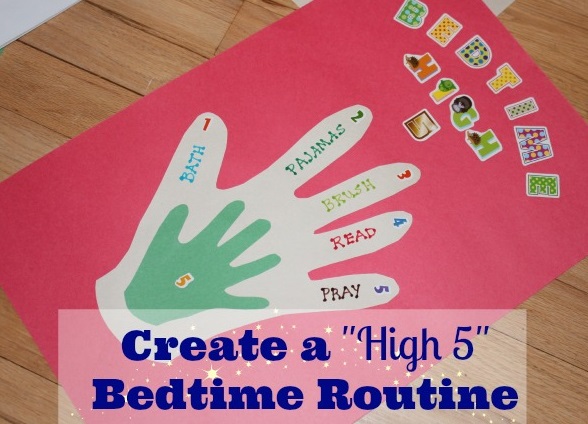
Create a Little Ritual Specific to Your Child: This may be hiding a few stuffed animals for them in their room they usually take to bed with them. After they find them they can lay down with them together.
Read “Bedtime” Books: Every child is different but using some of the same books to signal “bed time” can be very helpful. Reading about going to bed can be helpful as well.
Some of our favorites are:
“The Going-To-Bed Book” by Sandra Boynton
“Pajama Time!” by Sandra Boynton
“If Animals Kissed Good Night” by Ann Whitford
“The Wonderful Things You Will Be” by Emily Winfield Martin
“Goodnight Moon” by Margaret Wise Brown
“I Love You to the Moon and Back” by Amelia Hepworth
“Pete the Cat and the Bedtime Blues” by James Dean
Story Telling Prompts: Another great activity for toddlers and older kids are Story Telling Prompts. They are not just a great family activity that calms your little one before bedtime but helps build vocabulary, imagination and creativity.
First, print off the storytelling prompts, think about what your child is most interested in and tailor each prompt accordingly. After printing them (or just writing them on a piece of paper) put them in a jar. Some examples that worked well for our “Story Telling Prompts” are:
-One day a family of cats went shopping for a new family pet…
-Pete the Cat got up this morning and was very excited about…
-Sofia found a treasure chest – what was inside the chest?
-Three little pigs invited a little girl over for dinner…
-When the phone rang this morning the kids found out it was a snow day…
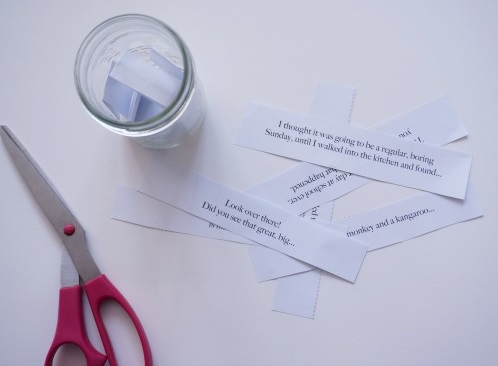
Have each person that’s involved in this activity pull a prompt from the jar. Spend some time creating and listening to stories together.
To have a few key questions on hand in case the storyteller becomes stuck can be helpful:
What did you see?
What did you hear?
What did you smell?
Who else is there?
What does the room/space look like?
How do you feel?
Where did you go?
This activity can be enjoyed by children of all ages and doing this with more than one child might prompt the participants to help each other out if they get stuck while telling the story. Building and sharing stories as a family is great fun.
Good Thoughts before Bed: Fill your child with good thoughts before they go to bed. Ask them about their favorite part of the day, praise them for a good deed and/or pray with them.
“Thank you for the food we eat
Thank you for the friends we meet
Thank you for our work and play
Thank you for this happy day”
Permalink
|
0 Comments
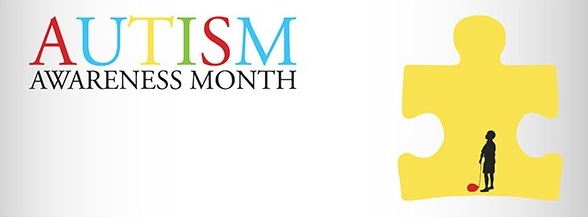
Each year on April 2, World Autism Awareness Day, iconic buildings across the world turn their lights blue to promote autism awareness for the whole month of April. The awareness of autism spectrum disorder is continuing to increase and luckily support networks are in place for people who have been diagnosed as well as their families. Below we have gathered some information which we feel would be valuable to anyone in contact with a child that has autism or simply wishes to know more about autism and how to help. Please be mindful that each and every child with autism has their own unique challenges.


What is Autism?
When people refer to “Autism” today, they are usually talking about Autism Spectrum Disorders (ASD), which can impair social interaction and communication. Children with ASDs might have unusual ways of learning, paying attention, and reacting to different sensations. Every child on the spectrum has unique abilities, symptoms and challenges. This is why the word ‘spectrum’ is used. Sensitivity to the environment around them is another common symptom. Each sense can be either over sensitive or under sensitive and this can change daily or throughout the day.
Autism in the Classroom
It is important to realize, like any other child, each child with autism is different from the other. Each child has their own way of seeing the world, which makes each child with autism unique. This means that, just because strategies that have been used and have worked for one child with autism, may not work for the next child who is on the spectrum. Here is a list of ideas to help create a supportive learning environment for children with autism.
Try to learn as much as you can about the child – Find out special interests and possible obsessions, as this can be a valuable teaching tool and will help interacting with the child.
Routines and schedules – As with any child, creating a predictable routine give a child confidence, independence and reduces anxiety. This can be especially important with a child on the spectrum. In a classroom setting using a visual schedule can assist with successful transitions between activities. Using a timer to give a time warning can also be helpful.
Visual supports – Research shows that children with autism have visual strengths. Use visual strategies to improve their understanding and positive interactions with learning. Where possible, include visual images when teaching.
Social skills and educating others – Children with autism need support in social situations. Creating such opportunities will help interaction. For example, provide an organized environment with a small group of children who are provided with a structured activity. Teach specific social rules and skills, such as, turn taking and personal space. Educating children that are not on the spectrum about the challenges a child with autism faces will help develop awareness, acceptance, tolerance and friendships.
Communication is crucial – Many children with autism find it difficult to pay attention and follow instructions. Keeping language simple and concrete is important. It is best to get the point across in as few words as possible. Repeat instructions if necessary and always address the child by their name and check for understanding. Most importantly, give positive feedback when the child responds.
Understand behaviors – Gain knowledge about the child and information on what may upset them. Having a handful of strategies to calm the child down, if their behavior is escalating is important. Children with autism often seek sensory activities such as flapping, twirling or rocking to help calm their anxiety. Using a sensory toy can improve their behavior.
Achievable goals, feedback and rewards – It is important to give a child with autism achievable goals to work towards. Giving them at least one familiar aspect will reduce stress. Celebrate even the smallest of successes. Choose rewards that are functional, concrete and capable of immediate sensory feedback. Compiling a list of rewards will be helpful to know what motivates the child.
Limit choices, give instructions – By reducing choices, you will find children with autism engage more quickly in activities. For example, if a child on the spectrum is told to choose a toy from the bin, they may find that overwhelming. If, instead, you give them two toys to choose from, they are more likely to engage in the play. Also, giving instructions rather than asking them a lot of questions can more easily engage them. For example telling them to bring you a book you can read together instead of asking if they would like to read a book, or which book they would like to read.
Autism And Successful Birthday Parties
The Peer Party
As a parent to a child on the spectrum, you may get invites from kids in daycare, preschool, the neighborhood, etc. Below find some factors to consider especially if you aren’t as familiar with the family.
Get to know them and the circumstances – Contact the host and try to get a better sense of what the party will entail. Will there be an activity that you know your child is afraid of? How many children are expected? What kind of food will be served? Having this information ahead of time is crucial in planning for success but also making the decision if this might be too overwhelming for your child.
Social Stories – Review ahead of time what is going to happen. Prepare the child for loud singing, presents that will be opened (that won’t be theirs!), taking turns on the playground equipment, etc. Read or tell the story many times before attending the party. Trying to prepare as much as possible is important.
Food – To know what kind of food will be served at the party will allow you to pack snacks or food your child will eat. Alert the host ahead of time, they might be unfamiliar with your child, and may be offended if they think your child chose to eat other food.
Overstimulation – Kid’s parties can be one of the most over stimulating events ever! Some adults are overwhelmed by the thought of a small space with 30 screaming, sugar happy children. Now imagine this for a sensory sensitive child. To know ahead of time if there might be an escape, such as a quiet room if needed, will be good information to have to make an informed decision on whether to attend the party.
Advocate – It is a personal decision on if and how to discuss your child and what information to share. Let the host know what may be hard for your child and that you may not stay for the whole party ahead of time. Educating others is the first step in a long road to acceptance but it is important when others tend to make assumptions regarding behavior they see.
Autism And Successful Birthday Parties
Your Child’s Party
This is supposed to be a fun day to celebrate your little one. You cannot avoid every potential problem but you can try to steer clear of as many as possible.
The Guest List – Take the number of people and their familiarity with your child into consideration. Sometimes grandparents, aunts, uncles and cousins can be enough. Always try to think of it from your child’s point-of-view. What amount of people and who would make it a positive day for them?
Location – Where is the best place to have the birthday party? Sometimes home parties are more comfortable and predictable than other locations with typically less unwelcome surprises. Some children are perfectly capable of handling a bounce venue – you know your child best- so individualize the party location for their wants and interests.
Visual Schedules – You can not plan everything perfectly ahead nor is planning a guarantee that everything will go according to plan. However, figuring out the sequence of events ahead of time and reviewing it with your child prior to the party might make a difference. The use of pictures, objects or a list of activities; can help with understanding expectations. These tools can also be used during the party. To bring them out to keep reviewing what is going to happen next might help.
Social Stories – As with peer parties, try to review any difficult situations in story format before the party. (This includes talking about the attendees, what events will occur and other things he/she should expect).
To Sing or Not to Sing – The “Happy Birthday” song has left many children in tears. This is again based on your child’s individual case. Some parents don’t know until they try. Preparation can make a huge difference; the unexpected might be the bigger issue sometimes when singing to the birthday boy or girl.
Educate & Advocate – Recognize that some people may not be adequately educated about autism, sensory processing disorder or other spectrum diagnoses. This might be a good opportunity to educate and advocate. Before the party, sit down with any individuals that may need help recognizing why certain behaviors occur and what the underlying issues may be.
Permalink
|
0 Comments
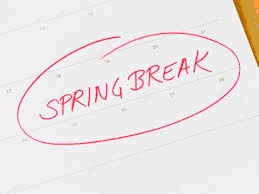
Your calendar says Spring Break. This is a great time to have some activities ready each day to enjoy with your kids. Below are some ideas on how to plan for a weeks worth of fun.
- Pick a theme and do activities around it (one a day) to create an at home camp- we picked spring.
- Read a book on “How Things Grow” and plant Magic Jelly Beans after to see what they grow the next day.
- Flower play dough for spring.
- Create a spring play dough garden.
- Flower Shop.
- Finger print dandelion craft/ Fly away dandelion with Q- tip.
- Frogs on log art with song.
- Kite Art.
How things grow
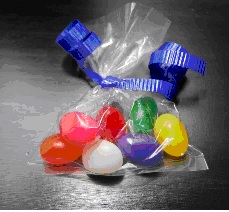
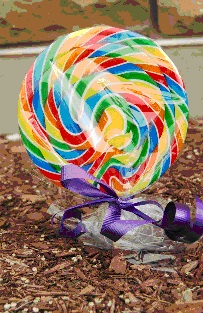
- Prepare a little bag of “magic” Jelly Beans after learning about the concept of “How things grow”. There are many excellent books you can read with your kids on this topic, such as “My first book about how things grow” by Usborne books, or “How things grow” by Eric Carle.
 2. Plant them
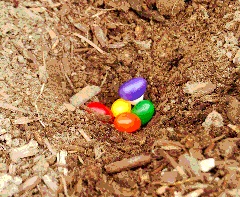 3. The next morning go and see what grew overnight
Spring Flower Play Dough
Basic recipe
- 1 cup all-purpose flour
- 1 cup water
- 1/4 cup salt
- 2 tsp cream of tartar
Extra items
- Red food coloring
- Rose water or flower-scented oils such as lilac, jasmine, rose or geranium
- Real flower petals
Add the ingredients for the basic recipe to a saucepan, along with a few drops of the red food coloring (optional: a drop or two of the rose water or scented oil). Stir well (older kids can help with this) until everything is combined. It might look a bit lumpy. Place the saucepan over low heat and keep stirring until the mixture will begin to thicken, forming into one large ball. Place it on parchment paper and leave to cool for a few minutes. When it is cool enough to handle, knead the dough for thirty seconds or so, which will make it less lumpy. If you used rose water, the play dough should be taste-safe. To make the dough look extra special break up the petals into small pieces and work them into the cooled dough.
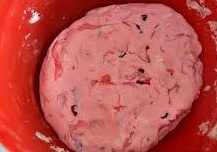
Your new play dough will look and smell like spring!
To use the play dough using our spring theme we had fun rolling it out and using a flower-shaped cookie cutter to make flower shapes. If you have play dough at home you can combine the freshly made flower shapes with some green and yellow play dough to create flowers.
Spring Play Dough Garden
What you will need for your spring play dough garden is your spring flower play dough (or any other play dough you have at home or you might have made), an egg carton and artificial flowers. You can set up this activity in an unstructured way so your kids can create and explore with the materials and build their flower gardens as they wish using their imagination.

The play dough can be used with or without the egg carton sticking the flowers in the play dough, the kids can pretend to plant them in the egg carton or any other container you may provide (what also works well are empty apple sauce cups).
This activity is not just fun but will enhance your child’s creative thinking and concentration skills. It will increase spatial awareness by experimenting with shape and space. You can work on oral language development by talking about the book you just read in combination with this activity or just experimenting with new words. Your child will work on their fine motor skills and coordination and self expression.
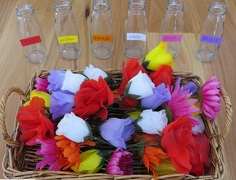
Flower Shop
Another fun activity is to create a flower shop. Here your child can get creative making bouquets; you can work on practicing their colors, problem solving and social interactions. You can create order forms with a picture of the flowers provided and your child can take your or their friends’ or siblings’ order. A play register could be included in this play – possibilities are endless and a lot of fun.
Dandelion Fingerprint Art
What you will need for this art project is white, brown, and green paint, a small paintbrush, paper a Q-tip and a finger.


The easiest way to start this project is by dipping your child’s finger into the brown paint and pushing it down on the paper. The stem can also be done with your finger or you can use a small paintbrush. After the colors dry, dip your child’s pinky finger in the white paint to complete the dandelion.
Variation: Instead of your child’s finger you can also let them use a Q tip.
Frog on Log Art with Song
For this art project you will need some green and brown paint, a black sharpie, red paper, glue and a wine cork.
To start have your kids dip the wine cork into green paint and make 5 dots on a paper. With their fingers or thumb they can dip into the green paint and push down on the paper next to the wine cork print to create the frog’s legs. Depending on your child’s age cut or rip a small piece of red paper and have them glue on a tongue once the paint dries. Lastly, use the black sharpie to add the eyes and use the cork again with brown paint to stamp on the logs.
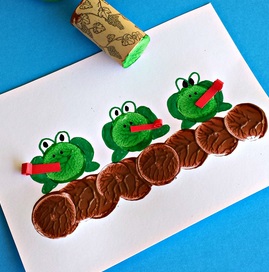
We did this project along with the song “Five little speckled frogs” and did five papers with 5, 4, 3, 2 and 1 frog.
The lyrics of the song are as follows:
“Five little speckled frogs
Sat on a speckled log
Eating the most delicious bugs
One jumped into the pool
Where it was nice and cool
Then there were four green speckled frogs.”
You start with 5 little speckled frogs and the verse is then repeated with one fewer frog each time. The final verse ends “Then there were no speckled frogs”.
If you don’t know this song you can find many different versions on YouTube to view:
https://search.yahoo.com/yhs/search?p=five+little+speckled+frogs+song&ei=UTF-8&hspart=mozilla&hsimp=yhs-002
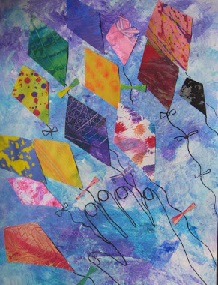
Kite Art
This project is an excellent way of using up any scrap paper you have around the house. To accomplish this look you sponge paint on a piece of paper with various colors. Once the paper is dry use a pen (sharpie seems to work best) to trace your child’s hand. Next cut (if you have smaller children you can prepare this ahead of time) some kite shaped pieces and have your child glue them on the paper. Draw the kites strings and ties or use any left over ribbon, etc. to glue on.
Books you can read with your child about kites:
“If I Were a Kite” by Wendy Wax: There is a small kite at the front of the book that fits on your child’s finger. As the story progresses, they can make the kite soar through the pages until reaching the end of the book.
“Kipper’s Kite” by Mark Inkpen: This is a touch and feel book
“Corey’s Kite” by Hannah Roche: Learn about weather as Corey flies his kite.
“One Windy Day” by Jane Caraway: When Janey’s kite gets stuck in a tree, her friends are there to help her retrieve it
Permalink
|
0 Comments


